 ta-Da! A new tutorial entry. yeah!
The picture to the left is a way to make bricks in perspective, but if you just need grid lines follow along...
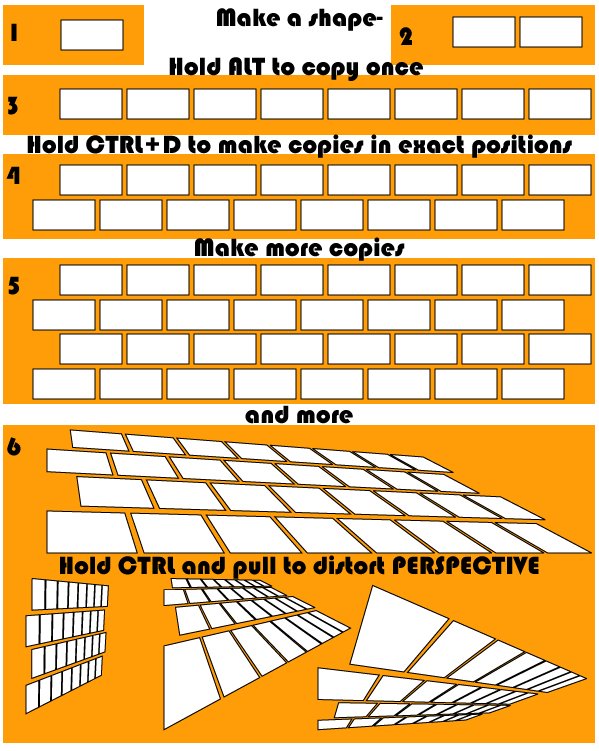
PERSPECTIVE GRID LINES
1.-Draw one line. Make a copy on that line directly under it by Holding ALT (on a PC) and pulling it down.
2.-Keep it selected and hold CTRL+D and everytime you hit "D" it will duplicate the line as many times as you need.
3.-After you have as many lines as needed select all of them with the BLACK ARROW (Direct Selection Tool) , PRESS THE "E" KEY, and hold CTRL and pull them anyway you need perspective lines.
4.-Duplicate steps 1-3 and make new lines in perspective going the opposite direction. You will then have a criss-crossed, "x" shape pattern great for using for perspective guidelines in the background.
Pro artists don't always draw perspective lines all the way to the horizon line. You need only have some criss-cross for your panel.
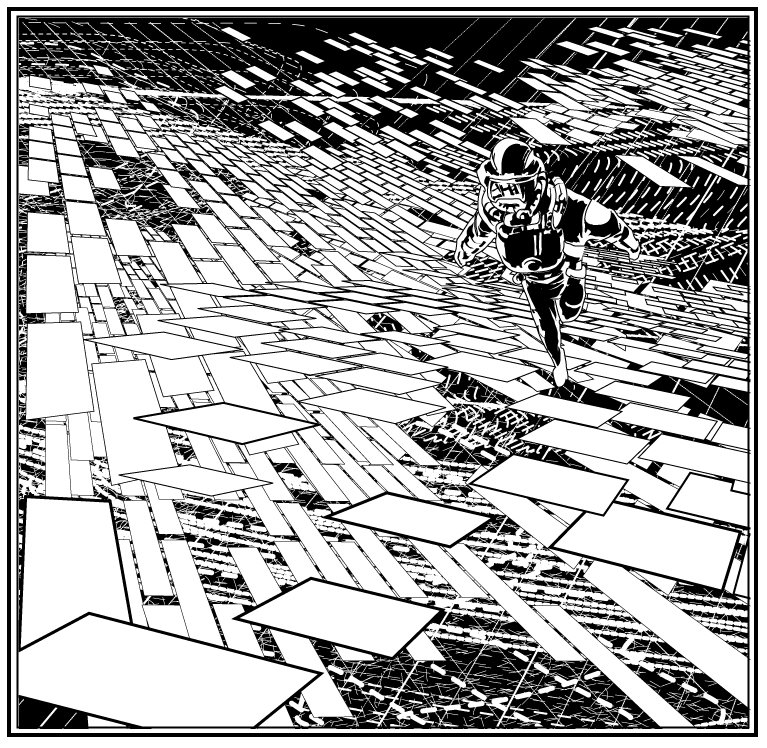 Here is a shot of how to make a picture out of some bricks. This spacewalk shot took less than 10 minutes. The squares were WHITE FILL and BLACK STROKE. The background was a black square on a lower layer. The lines in the back were created with my new buddy; the DASHED LINE.
Next time, I will show you how to make some crazy computer terminals with that little gem!

10 comments:
Greetings and Salutations!
I met you at Cape2 this last weekend. I wanted to remind you of a blog/tutorial/project that we spoke about. You were going to take a full drawing in Illustrator and explain how you decided to use the different techniques that you used to create different parts of the drawing. Hope you get a chance to do that!
Michael
Another cool tut man. Picked up a few things I didn't know/think of here.
Like I said before, I defo think Illustrator works much better then PS for this sort of thing, having tested the methods available.
For PS, I asked Fred E Williams II about his PS tuts [ http://freddieart.homeip.net/ ]in more detail once, and it really helped, but I felt it created alot of unecessary lines and slowed the file down too much.
One of the ideas I tried in Illustrator was using his method of the overlapping grids using the Star tool, giving it a zero inner radius. The plus side to illustrator though, you can easily just break the page barriers for layout purposes and even just create your points if you want, so I felt the options made it alot more flexible.
As for you're inking countours, I'm pretty sure it is just a matter of experience like you said.
Thanks again :)
Dave
Sweat jeezaloo! That's cool!
AWESOME!! Love the bg design!
Hi Brian,
This is so cool...but I can't get this to work in my CS2...
"PRESS THE "E" KEY, and hold CTRL and pull them anyway you need perspective lines."
Is this perspective feature in a menu? Object>transform, Effect>warp..?
??
-T
Just this one tip has made me a really happier person! It is going to be of tremendous help!
Thank you so much for this and for putting this blog together! You are awesome! Comics creating tips for Illustrator, I don't think that had been done before, that with resources for the program being quite rare.
Thank you once again for your efforts, and I'm looking forward to seeing more of you. :)
Cool stuff, but doesn't work in CS2
It does work in CS2. I just did it myself.
The function is called the Free Transform tool. Try again. It really works
I am using illustrator cs3 and when I select all the lines and click E, I get the free transform tool, but it only scales and rotates them, doesn't give any perspective effect.
Good readinng
Post a Comment